

We have had a few requests from clients on bypassing Safe Links or Safe Attachments. Although these components of Advanced Threat Protection (ATP) have proven to be solid there can be a need to bypass, even just for testing purposes. We can accomplish this task by simply creating mail flow rules that allow you to bypass links and attachments processing for phishing. The key here is to modify the header properties, let’s begin!
What do you need to know before you begin?
- Estimated time to complete each procedure: 5 minutes.
- You need to be assigned ‘Organization Management’ permissions before you can perform these procedures. See the “Mail flow” entry in Feature permissions in Exchange Online.
Use the EAC to create a mail flow rule
The EAC allows you to create mail flow rules by using a template, copying an existing rule, or creating a new one from scratch.
ATP Safe Link Bypass Rule
-
- Go to Mail flow > Rules.
- Create a new rule from scratch, Add and then select Create a new rule.
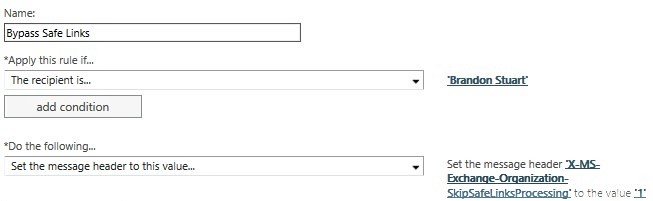
- In the New rule dialog box, name the rule, and then select the conditions and actions for this rule:
In Apply this rule if…, select the condition you want from the list of available conditions.
-
-
- Some conditions require you to specify values. For example, if you select The sender is… condition, you must specify a sender address. If you are adding a word or phrase, note that trailing spaces are not allowed.
- If the condition you want is not listed, or if you need to add exceptions, select More options. Additional conditions and exceptions will be listed.
- If you do not want to specify a condition and want this rule to apply to every message in your organization, select [Apply to all messages] condition.
-
In Do the following…,
-
-
- Select Modify the message properties, then choose Set the message header to this value (If the condition is not listed, select More options. Additional conditions will be listed.)
- In the first enter text field enter X-MS-Exchange-Organization-SkipSafeLinksProcessing
- In the second enter text field enter 1
-
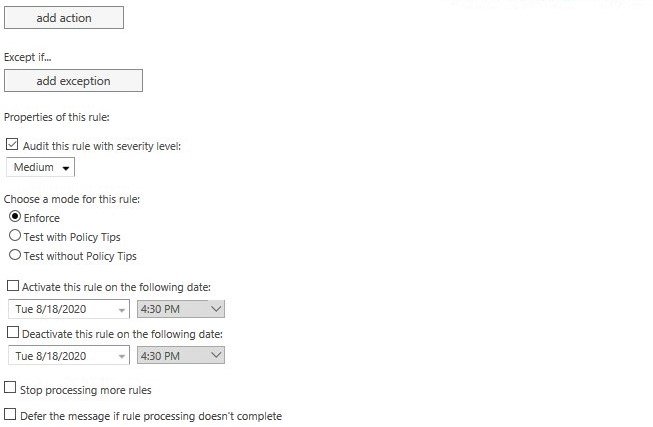
Under Audit this rule with severity level, select a level to specify the severity level for this rule. The activity reports for mail flow rules group rule matches by severity level. Severity level is just a filter to make the reports easier to use. The severity level has no impact on the priority in which the rule is processed.
Set the mode for the rule. You can use one of the two test modes to test the rule without impacting mail flow. In both test modes, when the conditions are met, an entry is added to the message trace.
-
-
- Enforce: This turns on the rule and it starts processing messages immediately. All actions within the rule will be performed.
- Test with Policy Tips: This turns on the rule, and any Policy Tip actions ( Notify the sender with a Policy Tip) will be sent, but no actions related to message delivery will be performed. Data Loss Prevention (DLP) is required in order to use this mode. To learn more, see Policy Tips.
- Test without Policy Tips: Only the Generate incident report action will be enforced. No actions related to message delivery will be performed.
-
- If you are satisfied with the rule, go to step 5. If you want to add more conditions or actions, specify exceptions, or set additional properties, click More options. After you click More options, complete the following fields to create your rule:
-
-
- To add more conditions, click Add condition. If you have more than one condition, you can remove any one of them by clicking Remove X next to it. Note that there are a larger variety of conditions available once you click More options.
- To add more actions, click Add action. If you have more than one action, you can remove any one of them by clicking Remove X next to it. Note that there are a larger variety of actions available once you click More options.
- To specify exceptions, click Add exception, then select exceptions using the Except if… dropdown. You can remove any exceptions from the rule by clicking the Remove X next to it.
- If you want this rule to take effect after a certain date, click Activate this rule on the following date: and specify a date. Note that the rule will still be enabled prior to that date, but it won’t be processed.
-
5. Click Save to complete creating the rule.
Brandon Stuart, PEI


